Following my recent work on the Welsh Women’s petition, I planned to do a couple of updates for the website. On doing one (see previous post) I discovered that all my previous photos had disappeared from the site. Being technically challenged, this was a big deal for me, but I contacted WordPress who were, to be fair, very helpful. However the news wasn’t good. Basically, my media library was empty and I had deleted all my photos. Somehow. I have no idea how I did it, which leaves me open to the possibility that if I rebuild my site I’ll do it again. However the upside of being a rubbish blogger is that at least the site isn’t huge.
So… I looked to find someone to help me who had WordPress knowledge and drew a blank. However a friend who I live with turns out to be a whizz on Wix and so we had a look together. Initially we looked to migrate to Wix, and I set up an account and everything. However their site designers have been guilty of making the whole thing really fancy and giving me too many options. So I decided to stick with the devil I know.
At least I have my friend to help me where I get stuck. So I’ll be starting from scratch with ‘how to use WordPress’ videos and rebuilding my website painfully over the next few months as and when I get the urge (which, to be honest, is likely to be rarely). Meanwhile I’m quite active on Instagram so if you want to see what I’m up to, you can find me at jenny_howellprint.
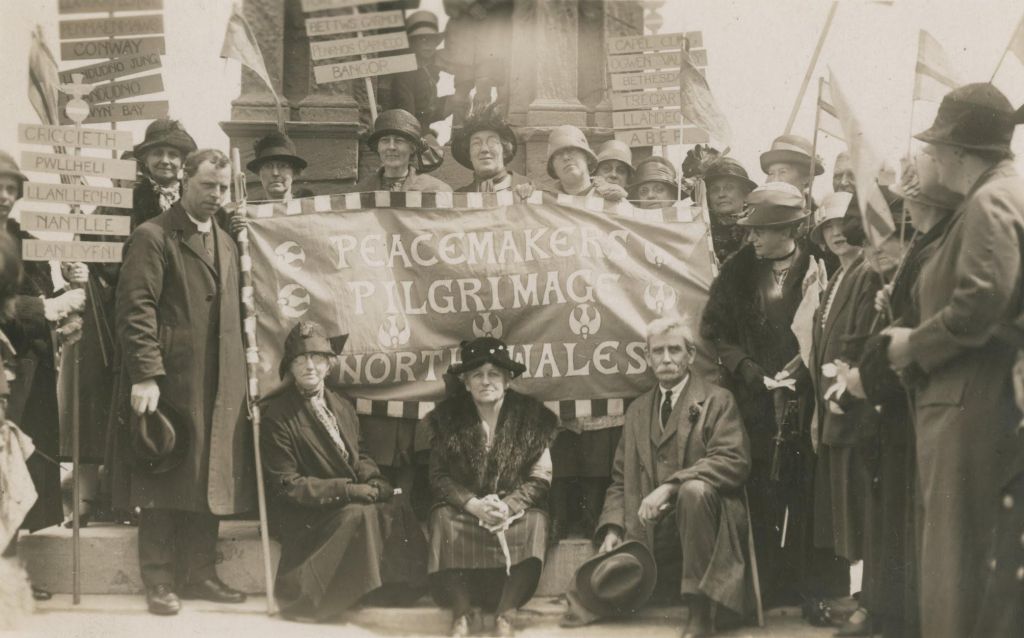
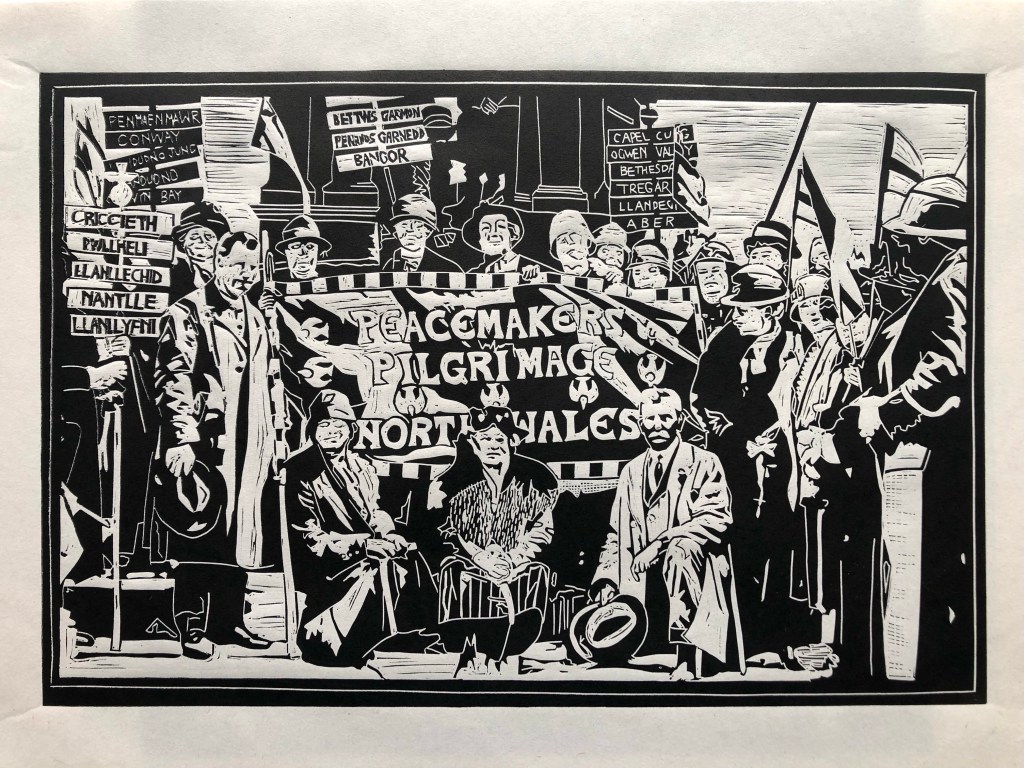
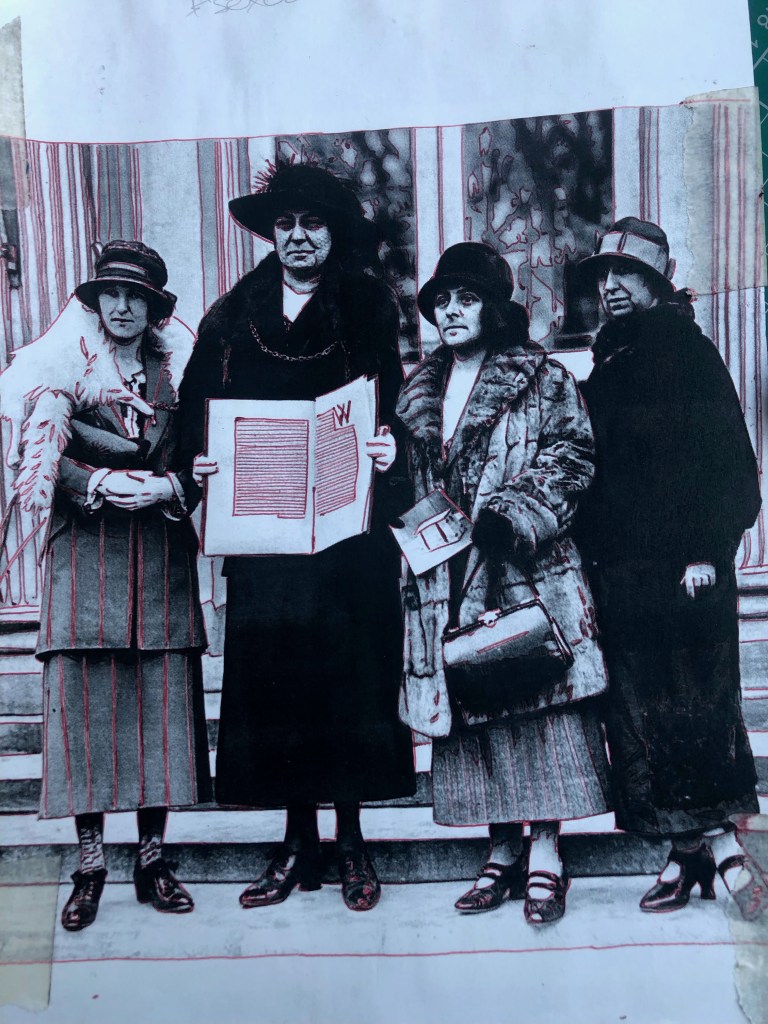
Following my work on the inauguration of the Temple of Peace in Cardiff, I have become fascinated, and inspired by the women’s peace movements that have taken place in Cardiff during the past century. The stories of the people depicted in my latest series of linocuts will be the subject of my next blog. However I have been taking photos as I go along, so I thought I would share them here for those who might be interested in my process.
I import the original photo into my computer and manipulate it to accentuate the contrast and remove some of the greys. I print it off at the right size for the linocut, having flipped it (to ensure that the final print is the right way round). Under the printed out image I put Tracedown which is a kind of waxy carbon paper for craft projects. Then I tape it all together to keep it from shifting about. I trace the image onto the block with a red biro, as that makes it easy for me to see any areas I have missed. Each stage involves making decisions which further simplify the image which makes cutting easier, and enables the final image to be nicely abstracted from the original.
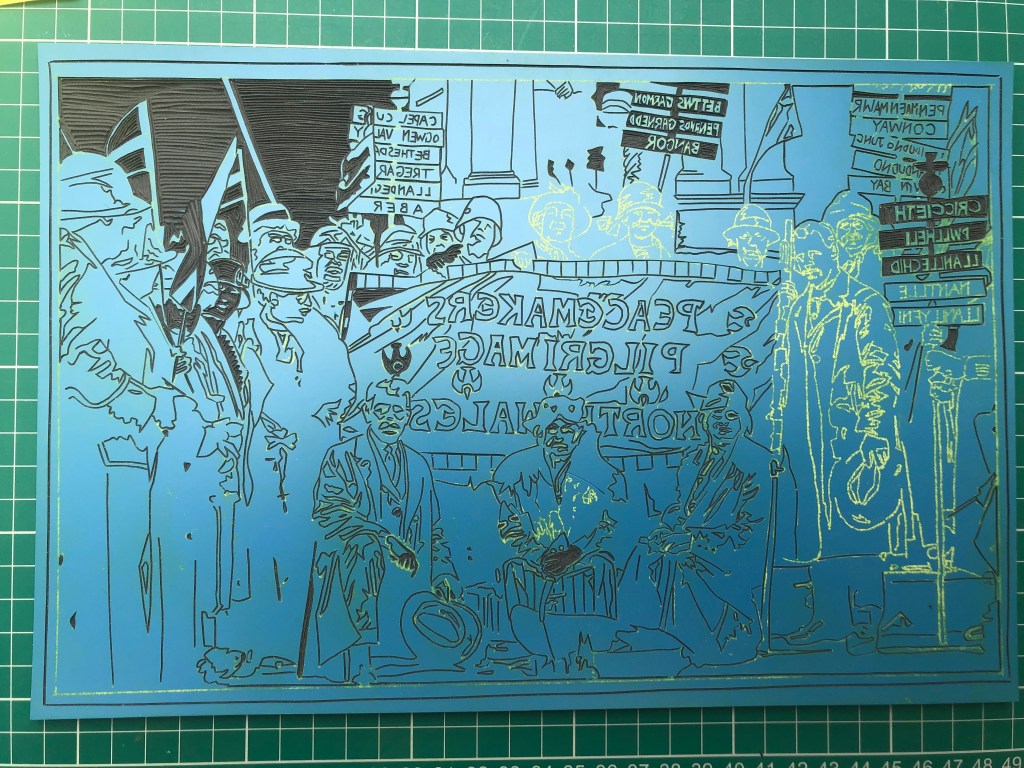
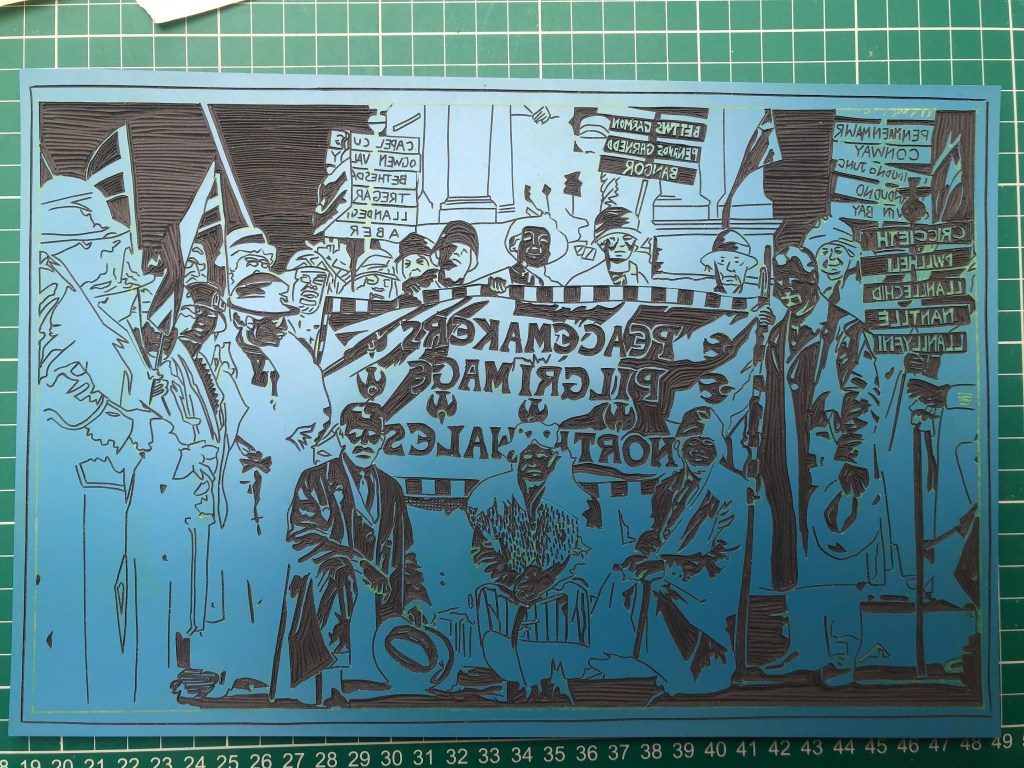
The cutting begins. It is really hard to concentrate on one task at a time, so I take turns between carving out the yellow lines (made by the Tracedown wax) and the less taxing clearing of larger spaces (in this case the sky). The lettering is so satisfying too, but it is easy to make mistakes so I did it in small blocks to ensure I was fully concentrating. Where I am not sure if I want the black of clothing (say) to bleed into a black background, I leave the line untouched. It is always easy to cut out more to help ‘read’ the image. But once it’s gone, it’s gone!
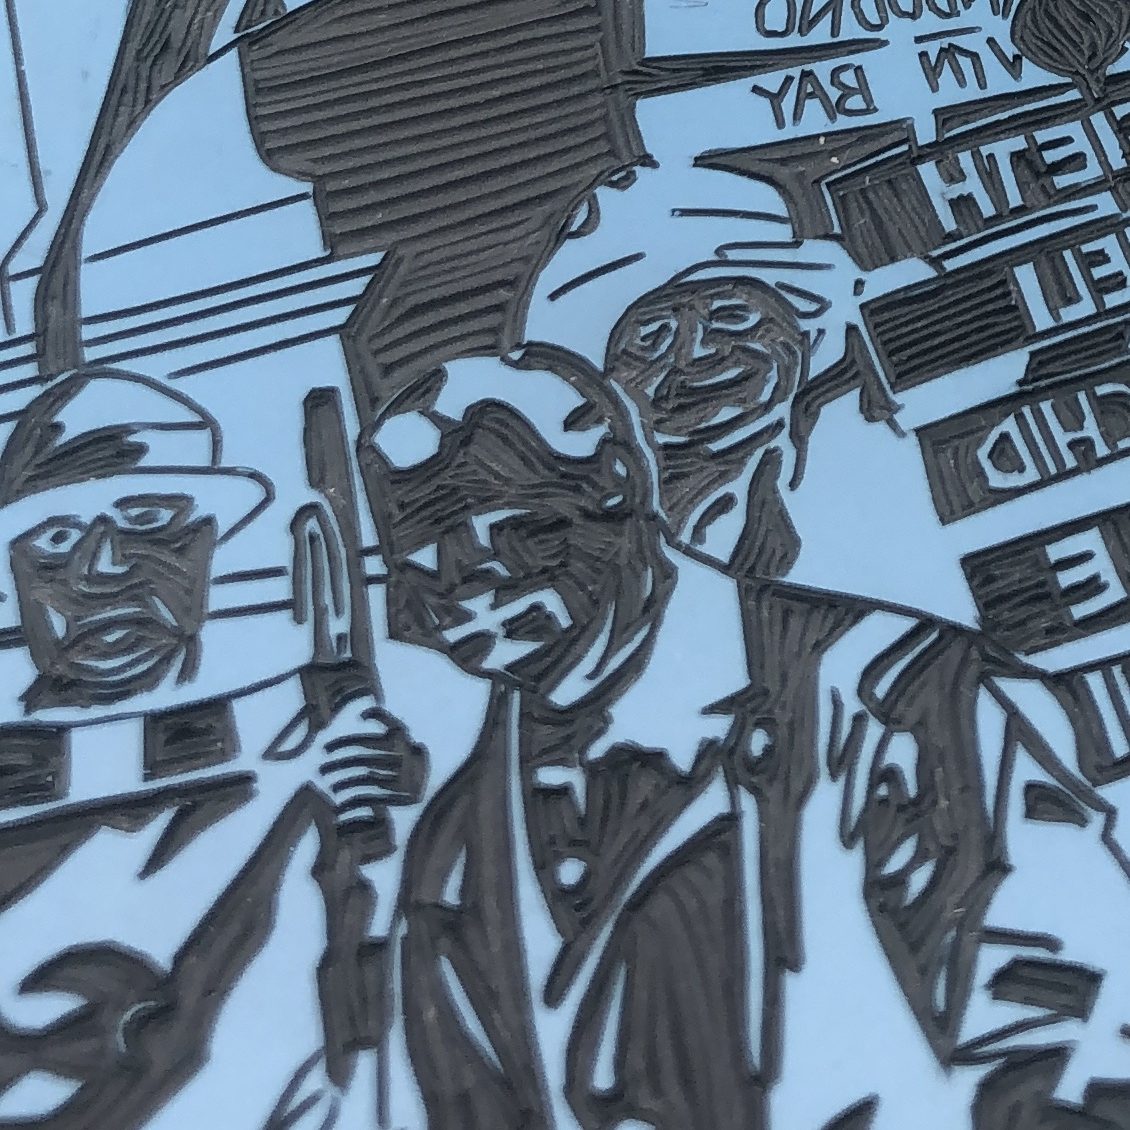
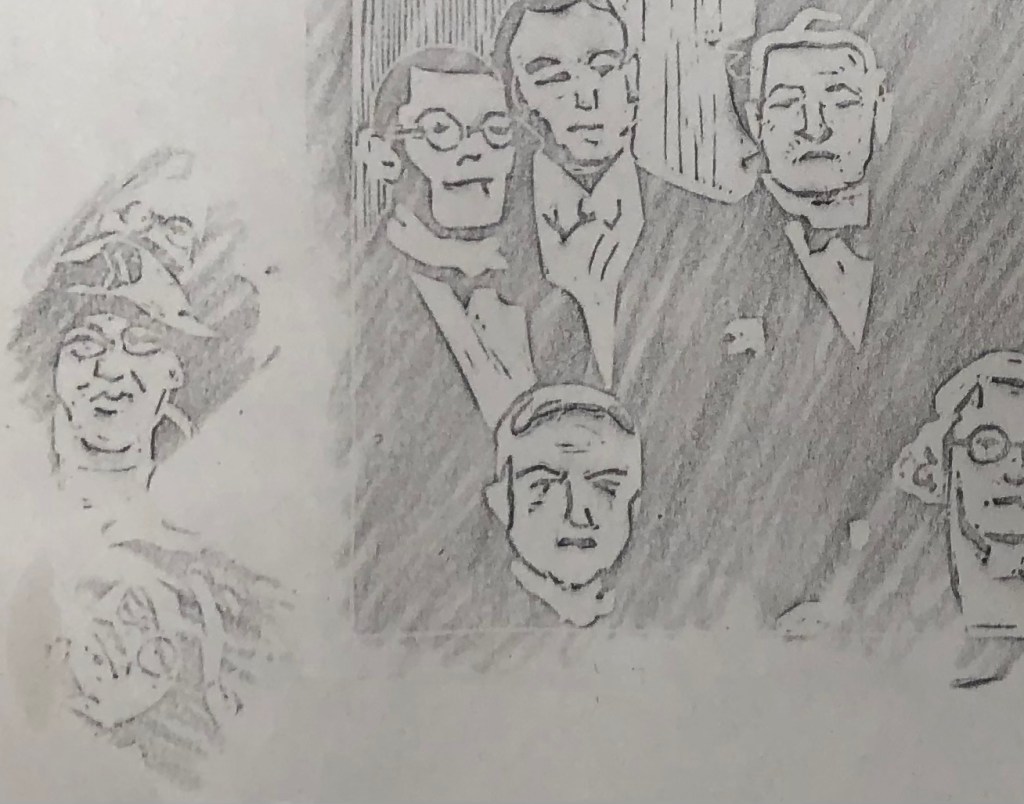
The faces are a real challenge and so I have learnt to go very slowly. It is useful using a historical image as you don’t have the person depicted looking critically over your shoulder for accuracy (or a flattering portrait). However I made some critical errors here. Most clearly seen in the three ladies above the banner to the right of the block. I decided that they could have white features carved out of black faces as they were further back in the image and therefore less clear, in much the same way as the lettering in the background is reversed out. The faces looked terrible, and I had to do a hasty repair job to salvage them.
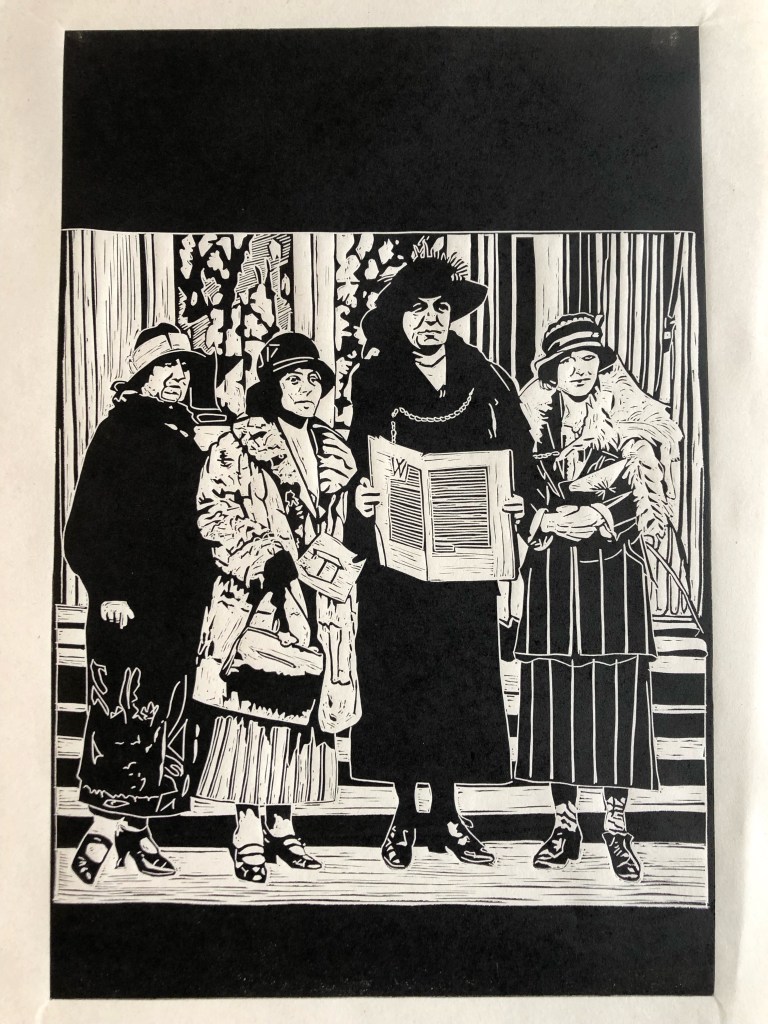
In order to salvage the faces I had to cut out a lot more lino, and lose the features where I had previously cut. Therefore the final images are a bit cartoonish and distorted. But much better than my first efforts!
Final image
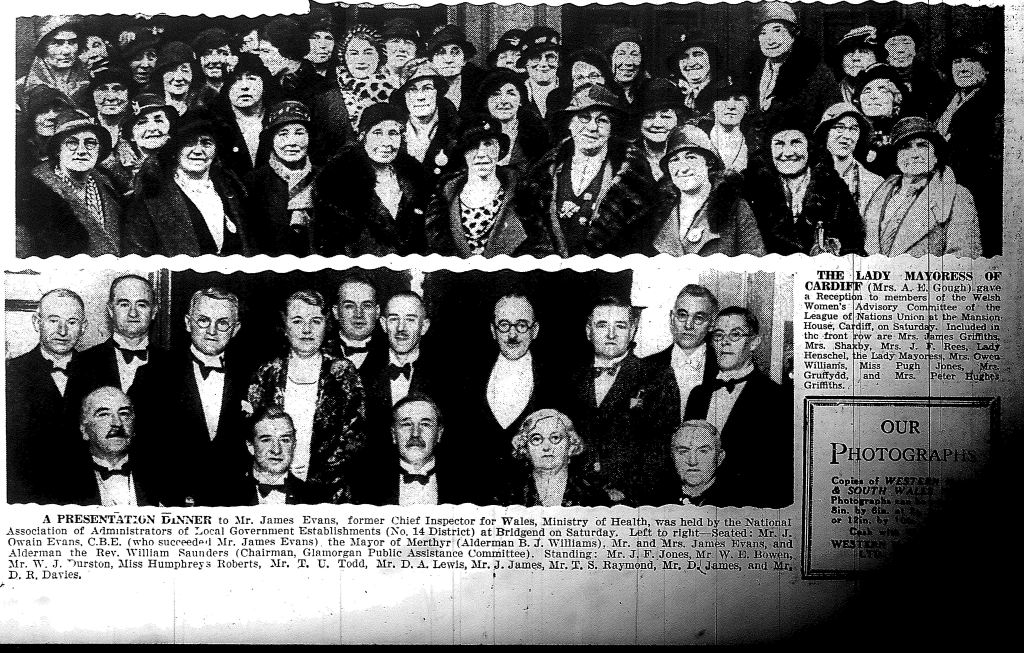
This photo is a cutting from the Western Mail. I chose it following my struggles with faces in the previous image. I decided it would act as the kind of ‘etudes’ written by composers to help musicians to improve technically. Because of the ‘halftone’ technique used to create images at this time the contrast is already perfect for me as the contrast is high and some of the detail is lost.
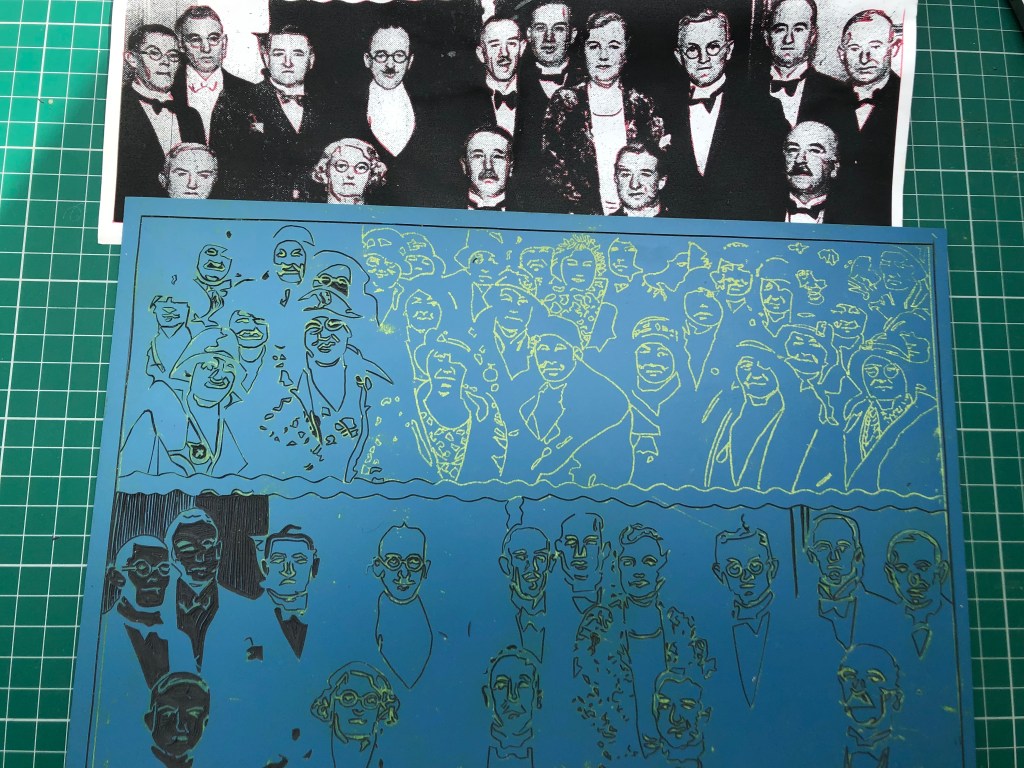
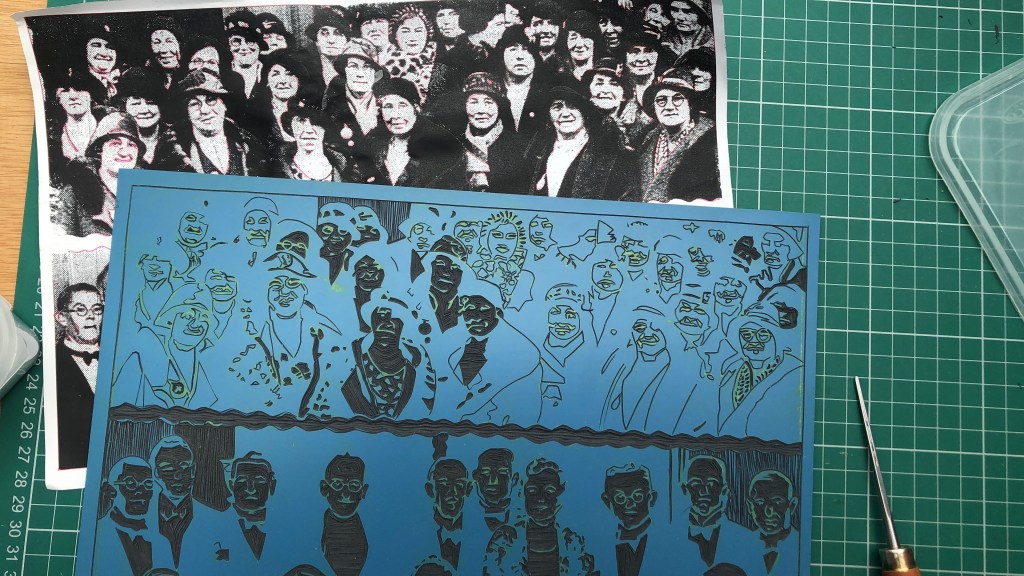
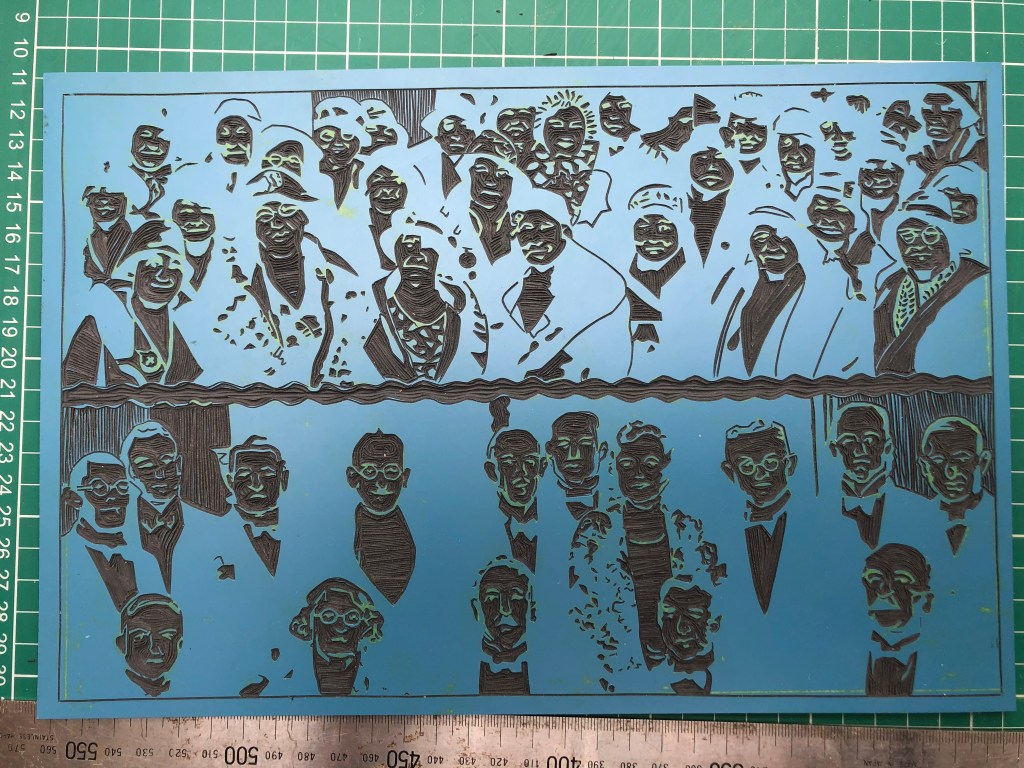
A lot of concentration went into this plate. So I was working in three different areas at once to prevent zoning out and making mistakes. The yellow wax is untouched at the top right which gives me some initial cutting out to do. Where I have cut out the people I have done each face as part of the whole body. Normally at the beginning of a session when I am at my freshest. The third element is the clearing (shirts and backgrounds mainly) which help the unscrambling of my brain. While I was working on this plate my father had a stroke and went into hospital. I took my work with me while I stayed in his flat for a couple of days. The intense concentration was hugely therapeutic at such a worrying time.
Once the features are carved in outline the magic begins as the faces get cleared and the expressions reveal themselves.
To see how the faces are working, I use a graphite pencil on newsprint to have a sneaky peek…
The block completed
Final image. This was a huge challenge for me, and some faces are definitely better than others. But so gratifying to see some individuality in expressions shining through!
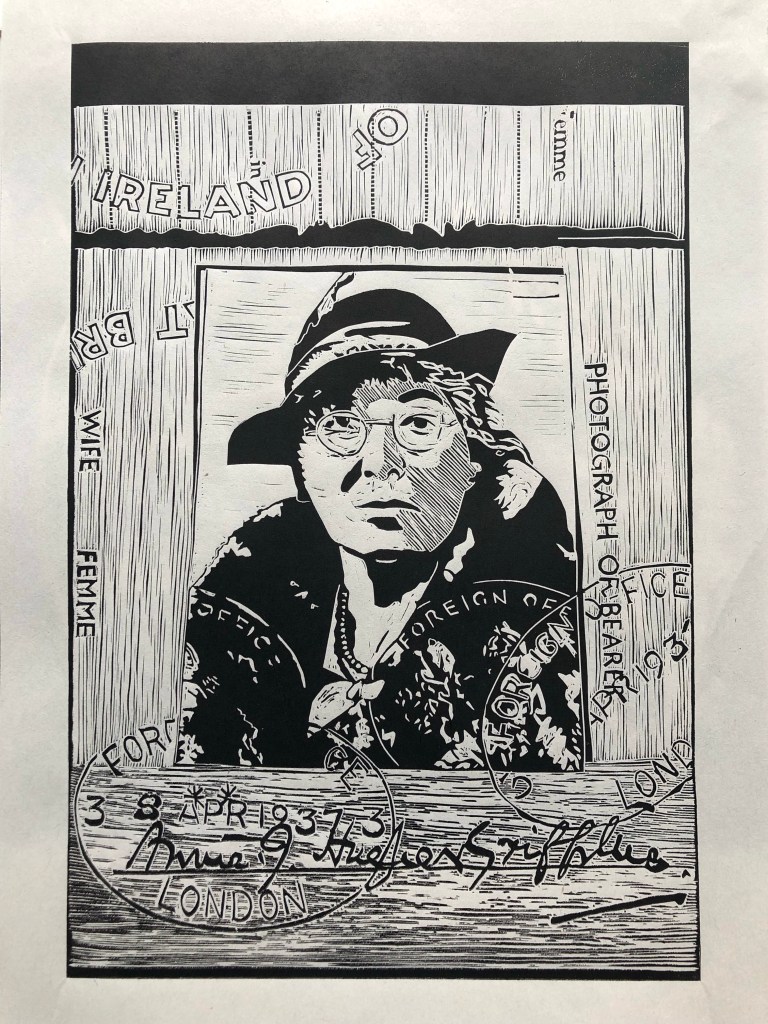
This image had some new challenges for me. How to depict the background texture and the raised stamps. Also the flatness of Annie’s image and the need for an accurate representation of her face. But I do love lettering of which there is plenty of variety here, and how could I resist trying to recreate her signature.
I left the face until last on this occasion and traced relatively little in order to allow me maximum flexibility when carving.
After much thought I decided to cross hatch Annie’s face to give more shape. I thought it would be too flat otherwise. I think of linocut as being much more black, white and blocky than an intaglio method like etching, but on occasion it can be really effective.
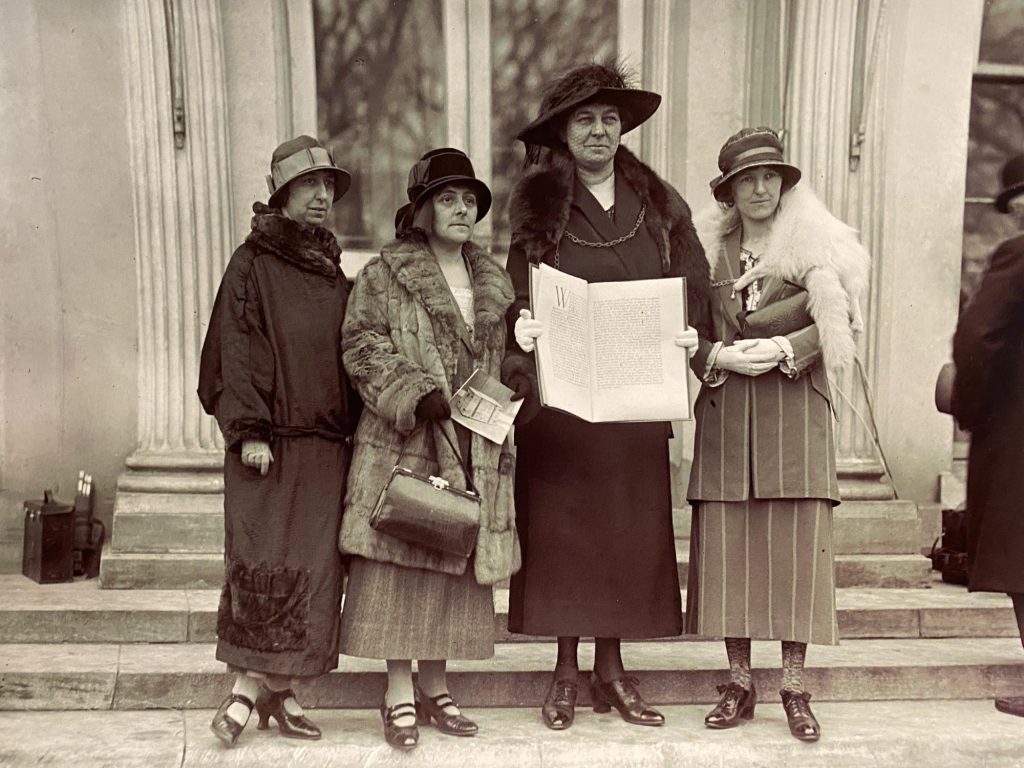
I left this image until last. While it had many of my favourite items like shoes and hats, it was a flatter image with some difficult textures (fur!) And the faces really mattered. Having done the first three images gave me the confidence to go for it.
I got lost among the lines of the columns on this one which were surprisingly difficult to render. The writing in the book was tricky as well. Annie’s net across her hat was a step too far, so I left it out!
On the next blog I’ll be putting together the history behind these fantastic photos, and giving due credit to the people who helped me out with the source material.
In my most recent blogpost … er… in February 2022, I promised that I would be posting more family linocuts soon. As ever, life got in the way and over a year has passed. However I have over the last couple of months got into a flow where this project is concerned and I have been very productive. I was spurred on by the Cardiff Print Workshop, of which I am a member, arranging four exhibitions this year. One has just been hung at the Penarth Pier Pavilion. Then we will be going to Turner House in Penarth, Cowbridge Town Hall and then back to Turner House early in 2024. As I have piles of photos of family members itching to be given the linocut treatment, I have given myself the task of creating new work for each exhibition. I should say that although these photos are in a box of family photos, it isn’t always clear who these people are. I have tried to ask my ageing parents who weren’t always much help, so I have been forced to give them space, and names, in the family just because they have demanded my attention. Here’s my latest series:
Aunt Maud
This lady is in a group with two other people (both of whom are equally worthy of the linocut treatment) at a wedding.
Grandma and Friends
I don’t know these two ladies, but I am intrigued by the three pairs of shoes. I’m assuming that the third pair belong to the photographer. I’m pretty confident the photograph was taken by my grandma.
Dubin and Tuka
I left school to attend Kingsway Princeton Sixth Form College in London which had a brilliant film and photography department. These two dudes must have studied somewhere in the college, but I don’t know how they found the time. They spent a lot of time hanging around our department where photography students all queued up to take their photos in the studio. In my mind, they found their way into that magazine of ’80s cool The Face, but I have no proof.
Yours Truly
This little cutie is me. Or very possibly one of my sisters…
Great Uncle Monty
This is a very old photo. Very possibly 100 years or so? I think with such a fine uniform and a swathe of medals (not to mention his hat) we might be able to find out more about him.
Francois
My friend’s father died last year. While sorting out his things, she came across this wonderful photo of him which she sent to me. I don’t know if she thought he would make a good linocut, but I did. How cool is this guy?!
Wow it’s been a long time since I wrote a blogpost. I had to ask for a new link because I forgot my password! It’s true that I have been focussed on other things recently, not least a huge building project which takes up most of my waking hours. However I have found the odd corner in which to be creative too. I have being doing some more family linocuts which I will share soon.
On Saturday, on a whim, I signed up to a Monotype printing day at the Cardiff Print Workshop where I am a member. This is the most basic of all printing methods, and something that I learnt in the ‘printmaking basics’ course that got me started a few years ago. I have remembered a few bits and pieces that I use when making cards, but linocut swept me away (always with black ink), and I got stuck in my own happy little rut. It is good to shake out the cobwebs on occasion though, and this course did just that. Bill Chambers is a fantastic teacher, and my fellow course attendees brought their own disciplines to the day, meaning that we all learnt as much from looking at what others were doing as we did from our own efforts. Monotype printmaking is like being back in nursery school, but being old enough to appreciate it. A purely exuberant opportunity to play and experiment. The intellect can take a rest and let curiosity run rampant! Despite hot competition, I won the prize for the most profligate user of paper, and of course not everything is worth sharing. But I have a very definite set of ideas that I intend to develop.
Starting from my own comfort zone, I dug out my tetrapak and metal wire (pre-formed from previous prints) and started using the laid out inks. The more garish versions made my head hurt, but I loved the yellow with a tiny bit of magenta (a gentle orange), overlaid with some black which had been reduced to 50% with extender (or probably more). The washer I found in my box was particularly pleasing as it picked up the ink really well. A couple of close ups show how wonderful the embossing effect is. It’s not possible to use metal on the plastic plates below because of the damage such an unforgiving material will do to the plate, but it’s fine on tetrapak. We used Fabriano paper, which was an eye opener. I have a pad I have never used, because it’s terrible for hand burnishing linocuts. Japanese papers are perfect for this. Fabriano is much thicker, and when wet is really spongey, enabling the items to create really deep impressions. The washer on the right is a great example of what you can do. The top and middle washers are ghost impressions from previous printings. Only the bottom one is where the washer went through on this print. Moving on to the plastic plates everyone else was using, I could no longer use my metal items. So they were swapped with more compressible elements – string and cotton thread. These threw up their own possibilities very quickly. The string, when printed, and then turned over to print again, had a superb texture. The thread, when turned over and spread beyond the plastic plate, broke up the edges giving extra interest. Where the items were lifted off the first pressing, they leave their own inky imprints, which print really well as areas of dark ‘string’ rather than the white of the original pressing. On the right hand image I didn’t dry the paper enough, causing the ink to spread. I like it.Inspired by the work of others in the class, I started digging into the shared pot of organic materials. The key to monoprinting is to accept that the first prints are to get the items inky and allow for more subtle effects on later prints. The print on the left is twice printed. The first print (with cyan ink) was with mostly clean plant matter which left white silhouettes. I hadn’t noticed that the large leaf at the top had previously been used, by someone using a mixture of cyan and yellow. so rather than a blank silhouette, I got a lovely green ghost. I overprinted this sheet with the plant matter turned over so that their inky side filled the white spaces. A good start, but the blue background is a bit stark.This is where the magic begins. Once all the items are inked up, and the plate has also developed its own residue from where the items were, it is possible to build up layers.The final print didn’t even use any additional ink. It is simply the ghosts of previous printings, all overlaid to produce levels of subtlety which are so beautiful to create. I even like the Fabriano watermark making it’s entrance. Who says material things don’t have agency??
So what have I learnt which I want to explore further? First and foremost the importance of using the ghosts of previous prints to work on. The beauty of embossing. The power of ink to pick up the tiniest detail, allowing the beauty of skeletal leaves, and the textures of everyday items like string to shine through. Most of all though, is the benefit of revisiting basic techniques when I’m in a position to absorb more information as a result of my few years experience. On the basics course, I was like a kid in a sweetshop. Within a couple of weeks I forgot almost everything. On this occasion I feel I have a solid base to develop further.
I have recently become the repository of our family photos. As both my mum and dad have downsized from their old homes, boxes of treasure have been dusted off and – at least in my case – been seen for the very first time. Some disappeared as soon as they revealed themselves, including a newborn Me in my mum’s arms in the kitchen. She was sporting a very stylish ’50s dress and I looked like – well – a baby. Others have been safely boxed up as the family treasures they are. The very finest just demanded to be cut into Lino!
This is my first portrait. Caz and Ali are pictured on their very first day going to Brownies. Unlike most of the photos in my possession, I have always known this photo. It graced my ‘autobiography’ written in the second year of secondary school and would probably be top of the list of possessions to save from the proverbial house fire…
Caz (left) doesn’t have the most successful uniform. I struggled with the relative greys and the fall of the cloth. The school I was really happy with, and the legs and socks made me laugh as I was cutting the block. Something so childish about them. The faces I left until last which is high risk, as if they don’t work, that is hours of cutting down the drain. I struggled, prevaricated, went back to the original photo, fiddled about digitally to give me more information to work with, and then plunged in. I managed to complete this part because I had told Michele that I would pull the test print before she left the workshop on Friday, and I only had an hour left. A deadline, however self-imposed, is sometimes the only thing that will work. My favourite part of the print though is Ali’s posture (right) which just shows her for the child she was at that age.
Funnily enough, once I had pulled the print, I sent a copy to my friend Carol. She pinged back a photo of her and her sister, at the same age, in the same uniforms – with pretty much the same expressions.
I’ve been a little distracted of late by my tetrapak journey. However I have been busy building up quite a selection of photographs at the same time.
Two new collections have been made into my latest zines. Work in Progress #4 and Jomec. Both zines focus on the changes still taking place at Central Square in Cardiff. Work in Progress #4 is a continuation of the photographs documenting the building works visible from the street.
Jomec is a view of one of the buildings taken internally. Jomec is the informal name used by everyone for the School of Journalism, Media and Culture, part of Cardiff University. Many thanks to the library staff for allowing me free access to wander about on a gloriously sunny day last January when the students were on holiday, to luxuriate in sun and shadows for as long as I wanted.
The photos contained in both zines can be found to the left. If you would like to buy any of my zines, just drop me a message and I’ll send you one (or more) for the princely sum of £4 each. Enjoy!
It was quite a step away from linocut towards using Tetrapak. With linocut the skill is in the cutting of the block. Once the image is cut, the inking up is pretty straight forward. Printing with Tetrapak is a whole other process. I had to learn how to print using the intaglio method, and using the press as well (setting aside my trusty baren).
An essential item for printing using the intaglio method is scrim. Tetrapak is pretty difficult to ink up as it is much less substantial than most base materials. The simplest method I have found is to apply the ink with a small knife (or my thumb) and then pull it back off with scrim in a straight upwards line, holding the bottom of the plate with a clean piece of material to avoid thumb prints.
It was natural as I became more comfortable with the process, to wonder what scrim would look like as part of the plate itself? Pretty good it turns out. Particularly making multiple prints with the same plate and pieces of scrim. The first plate isn’t up to much, as the scrim is clean and white, and leaves a blank, if textured surface, on top of the more subtle inky tetrapak. However using the same materials multiple times, interesting things begin to happen. As the previous pressings push the scrim into the base to create more interesting texture, so the scrim itself begins to ink up and print in subtler greys on top. The effect is gorgeous!
Many thanks to my friend Carol I checked out an exhibition on currently at the National Museum of Wales. She told me that there was an exhibition of industrial buildings on there, and that she reckoned it was my kind of thing. I was absolutely blown away! I only had 10 minutes, and had to skip the August Sander exhibition in the neighbouring gallery, but I am hooked, and will go back when I have more time. The information below is nicked from the exhibition blurb (and liberally paraphrased).
Bernd and Hilla Becher: Industrial Visions
From the late 1950s the Bechers began their project recording industrial buildings that were rapidly disappearing in the post-war decline of heavy industry. The project took them a lifetime to complete.
They began with the coal and steel industries in the Ruhr and Siegen regions of Germany before branching out in other parts of Europe and, later, North America. They travelled to Wales in 1965, and in 1966 spent six months in Britain, or which two thirds concentrated on Welsh collieries in the South Wales Valleys.
Their work, 225 photos arranged in grids according to the type of structure, include blast furnaces, water towers, winding towers, gasometers, cooling towers, washers, grain silos and lime kilns.
In the mid ‘60s their work was referred to as industrial archaeology. However after their book Anonymous Sculptures. A typography of technical constructions (1970) their work began to be positioned within the global art network.
In the neighbouring gallery there is an exhibition of portraits by August Sander who in the 1920s was seen to be embodying what was described as the ‘New Objectivity’ (Neue Sachlichkeit). His monumental series People of the 20th Century was a major influence for the Bechers.
So, I’m telling you from the off that this post won’t be for everyone. It is really for my benefit to record the things I am learning as I work through my ‘Dora Maurer’ phase. I am not alone, but on Friday mornings spend happy hours peering at my plates and prints for particularly pleasing imprints, or happy accidents that I may wish to learn from and so need to remember. So thanks to my fellow explorers and printmakers Mary and Michele for their collaboration.
The picture on the left shows my original tetrapak plate. I have used wire which I fixed into circles in an attempt to replicate Maurer’s image. Having really enjoyed using tape in previous prints because of the added interest they can give an image, I chose to stick them down with, variously, parcel tape, Scotch tape and masking tape. The initial image was not that interesting, but my interest was piqued when, as I released the wire I found myself with bits of tape with the wire imprinted on it, and areas of the plate untouched by the inking process.
Sticking the affected tape back down and taking a ghost print yielded really interesting results (print on left, modified plate on right), from both the tape in its new position, and where it was lifted after the original print. I can’t remember how the wire created such a black imprint on this second image (which is why I need to record as I go along)…
Following on from the first plate, I worked on replicating the effects by creating a simple image (plate one), printing it and then lifting the tape and wire to place in new positions. I didn’t bother to tape the wire down the second time, which made me realise this isn’t necessary (see below).
Print from the first plate. There’s lots I love about this print. The tetrapak creases. Always. The tape on the right and the ink below the wire. There’s something pleasing about the wire too, but I can’t put my finger on why. Not convinced by the tape holding it in place.
Pushing these new found techniques further – just to see what happens. Plate to the left and ghost print to the right (having over inked the first impression to allow a second print with moved elements. Again, I like the lifted tape and the previously imprinted tape. New here is the wire (at the top) removed to create a gorgeous white whirl with a black fuzzy edge. I like the embossed whirl (same wire moved to new position). The advantage of the paper being quite wet. Other new elements are the new ink whirl – which is quite punchy against the lighter grey, and the edge markings created with the edge of a spatula.
Taken the process too far in this direction, but very happy with the ‘splashy’ ink effect.
t
Ok so WordPress has defeated me on this blog. Note to self – follow the tutorial! So I’ll take the last five images together. Removing the tape is better I think. The image is less busy and allows the glorious texture of the Tetrapak to shine through. Which is the whole point really. With quite damp paper the embossed wire is a wonderful effect. By inking up the plate once the wire has gone through the press once (or multiple times) the remaining imprints can be inked up using the intaglio method which is really striking. Loving this journey!
I’m off to Wrexham today for the opening of Print International 2019. One of my Temple of Peace prints has been chosen for display and I am totally excited about it!
The print they have chosen is one of a series of four (see earlier blog) and on its own a bit devoid of context. I therefore decided to put together a zine putting together my four prints, together with archive material from the opening itself.
The Temple of Peace was opened on 24th November 1938, an irony not lost on us now, but also referred to at the time as the march to war was ramped up.
At a time of precarious peace, sandwiched between two massive conflicts, it seems entirely right to me that the focus was on the mothers who lost so many sons. Particularly poignant is the story of Minnie James “Wales’s most tragic mother” who lost three sons in the First World War. Her story talks of her remaining son, aged 27 in 1938, who wants to “do his bit” in the forthcoming war. As she says in the clip “I must not try to sway you. If it becomes a matter of honour or conscience and your country wants you, you must do as you think right and not mind me; I must suffer again. It is the lot of mothers the world over.”
I like to think we live in different times, and I left my sons in no doubt that if they so much as considered going into the army, I would kill them myself!
Given the focus on the mothers then, it is interesting that the print chosen for display is the one of three men who formed part of the audience for the inauguration ceremony. I am hoping to get a glimpse into why that print was chosen. Perhaps it will be for reasons I won’t have thought of…
All four prints are under the tab ‘Temple of Peace’ on this website. I am selling my zines for £4 including postage. If you would like one, e-mail me at jennyhowellphotography@gmail.com